AWS IOT Custom Authorizer
— AWS, IOT, Python, Arduino — 5 min read
Link to Repo
Background
There are some cases where using the standard x509 certificate based authentication can be a bit of a pain for some IOT use cases - A great example of this is if you want to integrate Tasmota with AWS IOT.
AWS provided an alternate way to authenticate called Custom Authentication, using
an AWS IOT Custom Authorizer.
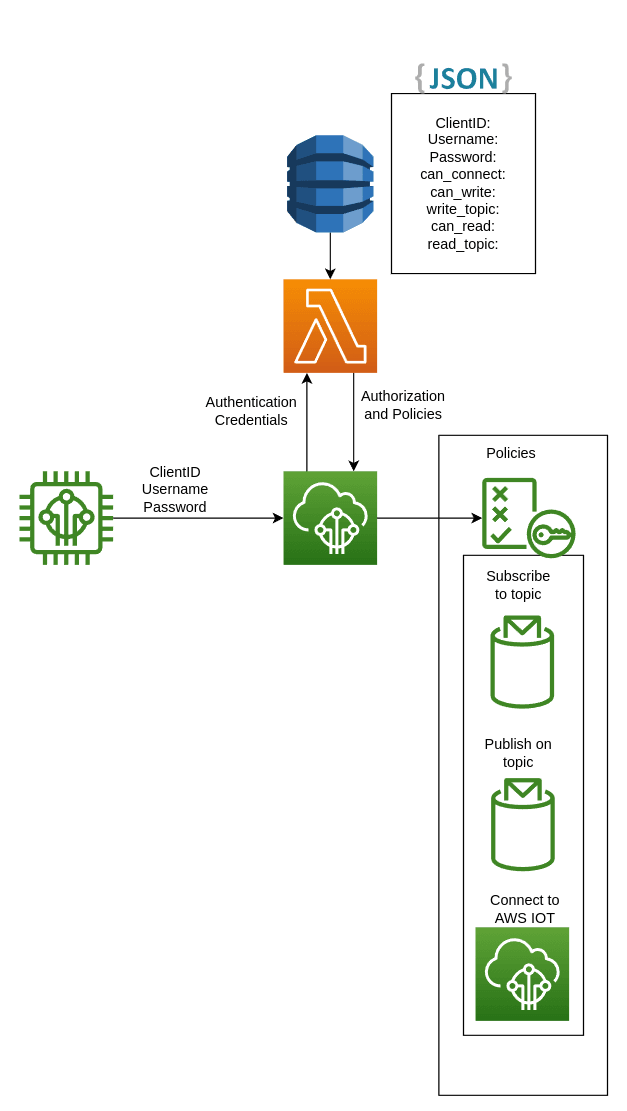
This essentially allows you to use standard MQTT username and password authentication. To use this, you must implement your
own AWS Lambda function to control your authentication (is this combination of client/username/password correct) and authorization
(what set of AWS IOT Policies you should have).
Issues I faced
When I was trying to get this going, I ran into a few issues:
- The official documentation had a lot of "Run this CLI command" instructions without really going into a lot of depth.
- There was minimal information out there for how to connect using a real world client which made it difficult to try to figure out why things weren't working.
- To compound #3, some open source information out there is very out of date (partly due to ATS endpoint changes made by AWS) which lead to me burning a lot of time trying things that had no chance of working.
- I couldn't find a single cloudformation'd example for how to run it that I could tweak for my own purposes.
Part of the reason for me writing this post is to try to document what I did, what problems I ran into and provide more of an end-to-end solution along with connection details to help others avoid running into the same issues that I ran into.
Implementation
I chose to use AWS SAM to simplify the deployment of my pipeline, creating This SAM Template with the goal of deploying a serverless design so that it would have minimal cost at the sort of scale that my personal project run at, and would require zero maintenance on my end.
The Lambda Authorizer sees the following data from a client trying to connect via MQTT.
1{2 "protocolData": {3 "mqtt": {4 "username": "USER_NAME",5 "password": "PASS_WORD",6 "clientId": "CLIENT_NAME"7 }8 },9 "protocols": [10 "mqtt"11 ],12 "signatureVerified": false,13 "connectionMetadata": {14 "id": "d0adaaa7-b22d-4545-923c-68a7ae2e337c"15 }16}One thing that caused me some grief and is explicitly called out in the documentation: The password that comes in via protocolData is base64 encoded, so you need to make sure to take this into account when writing unit tests, and make sure that your comparison function is something like this:
1def check_password(db_creds: DynamoModel, request_creds: MQTTData) -> bool:2 # Note, password comes in as base64 under normal circumstances3 return all(4 [5 db_creds.Username == request_creds.username,6 db_creds.Password == b64decode(request_creds.password).decode("utf-8"),7 ]8 )Providing the ground truth for credentials as the code segment above implies is a DynamoDB table. The Table uses Client_ID
as a key, allowing me to say "if the client id doesn't exist in the table then it's unauthenticated, if it does exist
then validate the username and password supplied.
By making this decision I can have a very simple DynamoDB schema.
1Table:2 Type: AWS::DynamoDB::Table3 Properties:4 KeySchema:5 - AttributeName: "Client_ID"6 KeyType: "HASH"7 AttributeDefinitions:8 - AttributeName: "Client_ID"9 AttributeType: "S"10 ProvisionedThroughput:11 ReadCapacityUnits: 112 WriteCapacityUnits: 113 TableName: "MQTTAuthTable"I can then use this table to pull out a list of fields (including Username and Password) that I need for the Authorizer to do its job.
1def get_details_for_client_id(client_id: str, table: Table) -> DynamoModel:2 return DynamoModel(3 **table.get_item(4 Key=dict(Client_ID=client_id),5 ProjectionExpression="Username, Password, AllowedTopic, allow_read, "6 "allow_connect, allow_write, read_topic, write_topic",7 )["Item"],8 Client_ID=client_id,9 )The return of the Lambda Authorizer is a json object that should provide the authentication
status (isAuthenticated) and a list of roles that the client is authorized to assume (policyDocuments).
1{2 "isAuthenticated": true,3 "password": "PasswordHere",4 "principalId": "PrincipalHere",5 "disconnectAfterInSeconds": 3600,6 "refreshAfterInSeconds": 3600,7 "policyDocuments": [8 {9 "Version": "2012-10-17",10 "Statement": [11 {12 "Action": "iot:Connect",13 "Effect": "Allow",14 "Resource": "arn:aws:iot:ap-southeast-2:MY_ID:client/CLIENT_ID"15 },16 {17 "Action": "iot:Receive",18 "Effect": "Allow",19 "Resource": "arn:aws:iot:ap-southeast-2:MY_ID:topic/integration/cbb38fe8/read"20 },21 {22 "Action": "iot:Subscribe",23 "Effect": "Allow",24 "Resource": "arn:aws:iot:ap-southeast-2:MY_ID:topicfilter/integration/cbb38fe8/read"25 },26 {27 "Action": "iot:Publish",28 "Effect": "Allow",29 "Resource": "arn:aws:iot:ap-southeast-2:MY_ID:topic/integration/cbb38fe8/write"30 }31 ]32 }33 ]34}The _topic and allow_ attributes pulled from the DynamoDB table control the generation of the Actions that
the client is able to assume (iot:Publish iot:Subscribe iot:Receive iot:Connect) and the Resources
that it's able to use those actions on.
The authorization route ends up looking like the AWS provided custom authentication workflow diagram but with the addition of a DynamoDB table for storage of credentials and roles.

The deployed SAM template for this example ends up being pretty short.
1AWSTemplateFormatVersion: '2010-09-09'2Transform: AWS::Serverless-2016-10-313Description: >4 AWS IOT Custom Authorizer with Python 3.9+ using AWS SAM5Globals:6 Function:7 Timeout: 38
9Resources:10
11 UnsignedAuthorizerPermission:12 Type: AWS::Lambda::Permission13 Properties:14 Action: lambda:InvokeFunction15 Principal: iot.amazonaws.com16 SourceArn: !GetAtt UnsignedAuthorizer.Arn17 FunctionName: !GetAtt AuthFunction.Arn18
19 AuthFunction:20 Type: AWS::Serverless::Function21 Properties:22 CodeUri: src/authorizer23 Handler: authorizer.app.lambda_handler24 Runtime: python3.925 Architectures:26 - x86_6427 Environment:28 Variables:29 AWS_ACCOUNT_ID: !Sub ${AWS::AccountId}30 DYNAMO_TABLE_NAME: !Ref Table31 Policies:32 - Version: "2012-10-17"33 Statement:34 - Effect: Allow35 Action:36 - "dynamodb:Get*"37 - "dynamodb:Query"38 Resource: !GetAtt Table.Arn39 Table:40 Type: AWS::DynamoDB::Table41 Properties:42 KeySchema:43 - AttributeName: "Client_ID"44 KeyType: "HASH"45 AttributeDefinitions:46 - AttributeName: "Client_ID"47 AttributeType: "S"48 ProvisionedThroughput:49 ReadCapacityUnits: 150 WriteCapacityUnits: 151 TableName: "MQTTAuthTable"52
53 UnsignedAuthorizer:54 Type: AWS::IoT::Authorizer55 Properties:56 AuthorizerFunctionArn: !GetAtt AuthFunction.Arn57 AuthorizerName: "MqttAuth-Unsigned"58 EnableCachingForHttp: true59 SigningDisabled: True60 Status: "ACTIVE"61
62Outputs:63 UnsignedAuthorizerName:64 Description: "Name of unsigned authorizer"65 Value: !Ref UnsignedAuthorizer66
67 UnsignedAuthorizerStatus:68 Description: "Unsigned authorizer active. Currently a placeholder value to be used when I create a secure authorizer"69 Value: true70
71 TableName:72 Description: "Table name that stores AWS Authorizer Credentials"73 Value: !Ref TableThe SAM template can be deployed by installing AWS CLI, AWS SAM and running
1sam build2sam deploy --guidedThere are some tests in tests/integration that help validate that the deployment is
successful, these make heavy use of pytest fixtures
to keep the tests DRY.
Connecting via the Authorizer
The best example for how to connect are the Integration tests that are provided in
test/integration as they include working examples with the test_invoke_authorizer command
to validate the authorizer works, as well as examples for Paho MQTT
and AWS IOT SDK V2. It's likely that you'lll need to set
the STACK_NAME environment variable to the name of your stack so that it can find your resources.
The main things to remember when connecting with a real client with a fair few listed in the guide:
- You will need to truncate
?x-amz-customauthorizer-name=to your username. - You will need to include an 'ALPN' of MQTT.
- You will need to ensure you trust the AWS IOT V3 CA Certificate.
- You will need to be using the
ATSendpoint, which you can find with the commandaws iot describe-endpoint --endpoint-type "iot:Data-ATS". - You will need to be connected to port 443 for MQTT authentication with a custom authorizer.
Connecting with Paho (Python)
1paho-mqtt==1.6.1Example connection code
1from urllib.request import urlretrieve2from urllib.parse import quote_plus3from pathlib import Path4import ssl5import paho.mqtt.client as mqtt6
7# client_id = YOU_NEED_TO_SET8# username = YOU_NEED_TO_SET9# password = YOU_NEED_TO_SET10# aws_endpoint = YOU_NEED_TO_SET11# authorizer_name = YOU_NEED_TO_SET12
13# Download CA certificate14aws_ca = Path(__file__).parent / "awsCA.pem"15urlretrieve("https://www.amazontrust.com/repository/AmazonRootCA1.pem",aws_ca)16
17# Create client18mqtt_client = mqtt.Client(client_id=client_id)19
20# Setup SSL21ssl_context = ssl.create_default_context()22ssl_context.set_alpn_protocols(["mqtt"])23ssl_context.load_verify_locations(aws_ca)24
25# Setup Client26mqtt_client.tls_set_context(context=ssl_context)27mqtt_client.username_pw_set(28 username=f"{username}?x-amz-customauthorizer-name={quote_plus(authorizer_name)}"29 password=password30)31# Connect32mqtt_client.connect(host=aws_endpoint, port=443, keepalive=60)From here I'd suggest looking at Steves-internet-guide for more information on publishing and subscribing using Paho.
Connecting and Publishing with AWS IOT SDK V2 (Python)
Thankfully this is a LOT easier as AWS provide a direct_with_custom_authorizer function that does most of the heavy lifting for you.
1awsiotsdk==1.11.3Example connection code
1from awscrt.mqtt import Connection, QoS2from awsiot.mqtt_connection_builder import direct_with_custom_authorizer3
4# client_id = YOU_NEED_TO_SET5# username = YOU_NEED_TO_SET6# password = YOU_NEED_TO_SET7# aws_endpoint = YOU_NEED_TO_SET8# authorizer_name = YOU_NEED_TO_SET9
10# Download CA certificate11aws_ca = Path(__file__).parent / "awsCA.pem"12urlretrieve("https://www.amazontrust.com/repository/AmazonRootCA1.pem",aws_ca)13
14aws_iot_connection = direct_with_custom_authorizer(15 auth_username=username,16 auth_authorizer_name=authorizer_name,17 auth_password=password,18 **dict(19 endpoint=aws_endpoint,20 client_id=test_client,21 ca_filepath=aws_ca.absolute().__str__(),22 port=443),23 )24connect_future = aws_iot_connection.connect()25connect_future.result(timeout=20)Once your connection_future returns successfully, it's trivial to start using the examples to see how to subscribe/publish.
Connecting and Publishing with C++ (PubSubClient) - ESP32/ESP8266/Arduino
As with all arduino/esp32/esp8266 things, I highly suggest using platformio with vs code as using a full-featured IDE makes your life a lot easier.
I have a link to a full example in my repo but as a summary.
I like to split up constants like passwords into their own header file.
1const char* wifi_name = "";2const char* wifi_pass = "";3const char* mqtt_username = "";4const char* mqtt_password = "";5const char* mqtt_client_id = "";6const char* mqtt_ats_endpoint = "";7const char* mqtt_custom_authorizer_name= "";8const char* mqtt_publish_topic = "";9
10// the AWS IOT CA certificate isn't a secret11// It's in here for convenience12const char CA_CERT[] = R"EOF(-----BEGIN CERTIFICATE-----13MIIDQTCCAimgAwIBAgITBmyfz5m/jAo54vB4ikPmljZbyjANBgkqhkiG9w0BAQsF14ADA5MQswCQYDVQQGEwJVUzEPMA0GA1UEChMGQW1hem9uMRkwFwYDVQQDExBBbWF615b24gUm9vdCBDQSAxMB4XDTE1MDUyNjAwMDAwMFoXDTM4MDExNzAwMDAwMFowOTEL16MAkGA1UEBhMCVVMxDzANBgNVBAoTBkFtYXpvbjEZMBcGA1UEAxMQQW1hem9uIFJv17b3QgQ0EgMTCCASIwDQYJKoZIhvcNAQEBBQADggEPADCCAQoCggEBALJ4gHHKeNXj18ca9HgFB0fW7Y14h29Jlo91ghYPl0hAEvrAIthtOgQ3pOsqTQNroBvo3bSMgHFzZM199O6II8c+6zf1tRn4SWiw3te5djgdYZ6k/oI2peVKVuRF4fn9tBb6dNqcmzU5L/qw20IFAGbHrQgLKm+a/sRxmPUDgH3KKHOVj4utWp+UhnMJbulHheb4mjUcAwhmahRWa621VOujw5H5SNz/0egwLX0tdHA114gk957EWW67c4cX8jJGKLhD+rcdqsq08p8kDi1L2293FcXmn/6pUCyziKrlA4b9v7LWIbxcceVOF34GfID5yHI9Y/QCB/IIDEgEw+OyQm23jgSubJrIqg0CAwEAAaNCMEAwDwYDVR0TAQH/BAUwAwEB/zAOBgNVHQ8BAf8EBAMC24AYYwHQYDVR0OBBYEFIQYzIU07LwMlJQuCFmcx7IQTgoIMA0GCSqGSIb3DQEBCwUA25A4IBAQCY8jdaQZChGsV2USggNiMOruYou6r4lK5IpDB/G/wkjUu0yKGX9rbxenDI26U5PMCCjjmCXPI6T53iHTfIUJrU6adTrCC2qJeHZERxhlbI1Bjjt/msv0tadQ1wUs27N+gDS63pYaACbvXy8MWy7Vu33PqUXHeeE6V/Uq2V8viTO96LXFvKWlJbYK8U90vv28o/ufQJVtMVT8QtPHRh8jrdkPSHCa2XV4cdFyQzR1bldZwgJcJmApzyMZFo6IQ6XU295MsI+yMRQ+hDKXJioaldXgjUkK642M4UwtBV8ob2xJNDd2ZhwLnoQdeXeGADbkpy30rqXRfboQnoZsG4q5WTP468SQvvG531-----END CERTIFICATE-----)EOF";Your main function would then look something like
1#include <Arduino.h>2#include <secrets.h>3#ifdef ESP324#include <WiFi.h>5#elif defined(ESP8266)6#include <ESP8266WiFi.h>7#endif8#include <WiFiClientSecure.h>9#include <PubSubClient.h>10WiFiClientSecure secure_client = WiFiClientSecure();11PubSubClient mqttClient = PubSubClient(secure_client);12const char *aws_protos[] = {"mqtt", NULL};13
14String mqtt_modified_username(const char * username)15{16 // AWS requires x-amz-customauthorizer-name along with username17 // note the authorizer name needs to be URL encoded if you use special characters.18 return String(username) + String("?x-amz-customauthorizer-name=") 19 + String(mqtt_custom_authorizer_name);20}21void setup_wifi()22{23 WiFi.begin(wifi_name, wifi_pass); 24 while (WiFi.status() !=WL_CONNECTED )25 {26 Serial.println("Failed to connect to WiFi");27 Serial.println(WiFi.status());28 sleep(5);29 }30 Serial.println("Connected to WiFi");31}32
33void setup_mqtt()34{35 secure_client.setCACert(CA_CERT);36 secure_client.setAlpnProtocols(aws_protos);37 mqttClient.setSocketTimeout(10);38 mqttClient.setServer(mqtt_ats_endpoint,443);39 mqttClient.setKeepAlive(60);40 while(!mqttClient.connected())41 {42
43 mqttClient.connect(mqtt_client_id,mqtt_modified_username(mqtt_username).c_str(),mqtt_password);44 Serial.println("Failed to connect to MQTT");45 sleep(5);46 }47 Serial.println("Connected to MQTT");48}49
50void setup() {51 Serial.begin(9600);52 setup_wifi();53 setup_mqtt();54}55
56void loop() {57 sleep(200);58 mqttClient.publish(mqtt_publish_topic,testPublishString.c_str());59}The highlighted rows are used to maintain compatibility between ESP32 and ESP8266 modules.
Debugging steps
There are some pretty standard steps that you can go through to debug this:
Run the Integration tests
If you're using the provided repository then the
integration tests in tests/integration are pretty good validation for whether everything is working as intended.
Check the Authorizer Lambda
Check your Lambda functions Invocations to check that it was called, and confirm whether that invocation provided any errors.
If you're not seeing an invocation then it's likely you've got issues with your connection strings, either because of your endpoint, not specifying an authorizer, not trusting the AWS Certificate, wrong port or possibly you've set your IOT authorizer to Status: "INACTIVE".
Check the Lambda returned message
Check whether the client was Authorized, and if not then check your username/password for the client.
If it was authorized then it's worth checking the returned policy and being mindful that not all MQTT wildcard characters will behave as expected in AWS IOT.
The following table from AWS documentation is very useful to keep in mind.
| Wildcard character | Is MQTT wildcard character | Example in MQTT | Is AWS IoT Core policy wildcard character | Example in AWS IoT Core policies for MQTT clients |
|---|---|---|---|---|
| # | Yes | some/# | No | N/A |
| + | Yes | some/+/topic | No | N/A |
| * | No | N/A | Yes | topicfilter/some/*/topic |
| ? | No | N/A | Yes | topic/some/?????/topic topicfilter/some/sensor???/topic |
Check the AWS IOT console
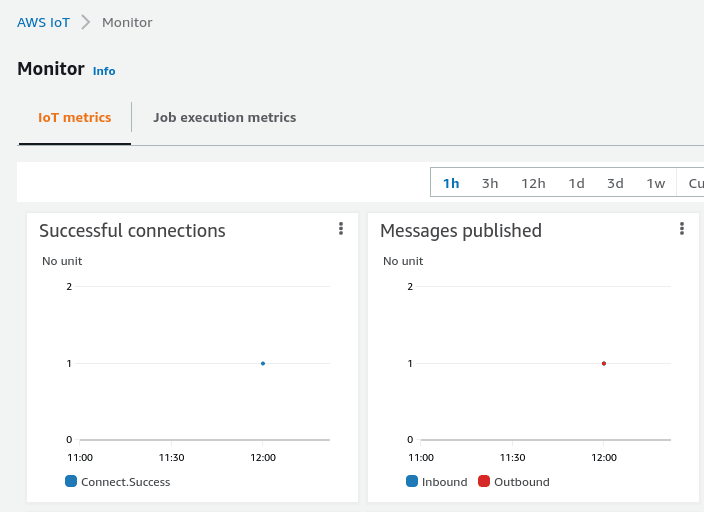
The AWS monitor page is going to be very useful to check whether AWS IOT saw your connection.

If you're trying to debug whether publishing is working, it's worth using the MQTT test client in the AWS console to subscribe to the topic that you're trying to publish to. Similarly, for testing subscriptions it might be useful to use the MQTT test client to Publish a message on the topic that you're subscribed to.